
Strawberry Crunch Cheesecake Cones: A Delectable Treat
Welcome to the Food Lovers Blog, where culinary adventures and delightful discoveries await. Today, we’re diving into a dessert that promises to tantalize your taste buds: Strawberry Crunch Cheesecake Cones. This enticing treat is a magical fusion of creamy cheesecake, luscious strawberries, and a satisfying crunch, all elegantly encased within a charming waffle cone. Whether you’re hosting a summer party, looking for a unique dessert, or simply treating yourself, this recipe is a must-try. Join us as we embark on this culinary journey to create a dessert that will leave a lasting impression on everyone who tastes it.
The Inspiration Behind the Recipe
Before we dive into the details, let’s explore the inspiration behind these delightful cones. Cheesecake itself is a beloved classic, revered for its rich and creamy texture. By transforming it into a handheld dessert, we’re not only making it more accessible but also adding a fun twist. The combination of fresh strawberries highlights the seasonal bounty of summer, while the crunchy topping adds a delightful textural contrast. This recipe is perfect for those who appreciate creativity in the kitchen and enjoy offering something unexpected to their guests.
The idea of using cones came from the desire to make desserts more interactive and portable, perfect for outdoor gatherings or casual get-togethers. The waffle cone acts as a convenient vessel that not only holds the dessert but also adds its own layer of flavor and crunch. This innovative presentation ensures that every bite is packed with a harmonious blend of textures and tastes, embodying the essence of summer in every cone.
Ingredients List
Before we get started, let’s gather all the necessary ingredients. This recipe is divided into three main components: strawberry sauce, cheesecake filling, and crunch topping.
For the Strawberry Sauce:
- 1 cup fresh strawberries, hulled and diced
- ¼ cup granulated sugar
- 1 tablespoon lemon juice
For the Cheesecake Filling:
- 8 ounces cream cheese, softened
- ½ cup powdered sugar
- 1 teaspoon vanilla extract
- 1 cup heavy whipping cream
For the Crunch Topping:
- ½ cup crushed vanilla wafer cookies
- ½ cup crushed freeze-dried strawberries
- 6 waffle cones
Optional Garnishes:
- Fresh mint leaves
- Additional diced strawberries
- Drizzle of chocolate or caramel
Timing
Creating these delightful cones is a process that takes approximately 1 hour and 30 minutes. Here’s a breakdown of the timing:
- Preparation: 20 minutes
- Cooking: 10 minutes
- Chilling: 1 hour
This timing makes it feasible to prepare this dessert in advance, allowing you to focus on other aspects of your event or meal. The chilling time is particularly important as it allows the flavors to meld and the filling to firm up, ensuring that each cone is as delicious as possible when served.
Step-by-Step Instructions
Now that we have our ingredients ready, let’s dive into the step-by-step process of making these heavenly Strawberry Crunch Cheesecake Cones.
Step 1: Prepare the Strawberry Sauce
The strawberry sauce is the heart of this dessert, bringing freshness and a hint of tartness to balance the sweetness. Here’s how to make it:
- Combine Ingredients: In a small saucepan over medium heat, combine the diced strawberries, granulated sugar, and lemon juice.
- Cook: Stir occasionally until the strawberries break down and the mixture thickens slightly, about 10 minutes.
- Cool: Remove from heat and let it cool completely. This cooling step is crucial to ensure the sauce doesn’t melt the cheesecake filling.
The strawberry sauce can be made a day ahead, which not only saves time on the day of serving but also allows the flavors to deepen. If you prefer a smoother sauce, consider blending the mixture after cooking and before cooling.
Step 2: Make the Cheesecake Filling
The cheesecake filling is creamy and luscious, providing the perfect contrast to the crunchy cone and topping.
- Beat the Cream Cheese: In a large mixing bowl, beat the softened cream cheese with an electric mixer until smooth and creamy.
- Add Sweetness and Flavor: Add the powdered sugar and vanilla extract, and continue to beat until well combined and smooth.
This step is where you can play with different flavorings if desired. For a citrusy twist, consider adding a teaspoon of lemon or orange zest. This will complement the strawberries beautifully and add an extra layer of complexity to the filling.
Step 3: Whip the Cream
Whipping the cream adds lightness and volume to the cheesecake filling, ensuring a delightful texture.
- Whip the Cream: In a separate bowl, whip the heavy cream until stiff peaks form.
- Combine: Gently fold the whipped cream into the cream cheese mixture, being careful not to deflate the whipped cream. This step is essential for maintaining a light, airy filling.
Ensure your bowl and beaters are cold when whipping the cream, as it helps achieve the desired stiff peaks more efficiently. This technique is crucial for creating a voluminous filling that holds its shape within the cone.
Step 4: Combine the Crunch Topping
The crunch topping adds a delightful texture and a burst of flavor, making each bite a delightful experience.
- Mix Ingredients: In a shallow dish, mix together the crushed vanilla wafer cookies and crushed freeze-dried strawberries. This will be your crunchy topping.
Feel free to experiment with different types of cookies or biscuits for the crunch topping. For instance, graham crackers or digestive biscuits can add a different flavor profile, while still maintaining the desired crunch.
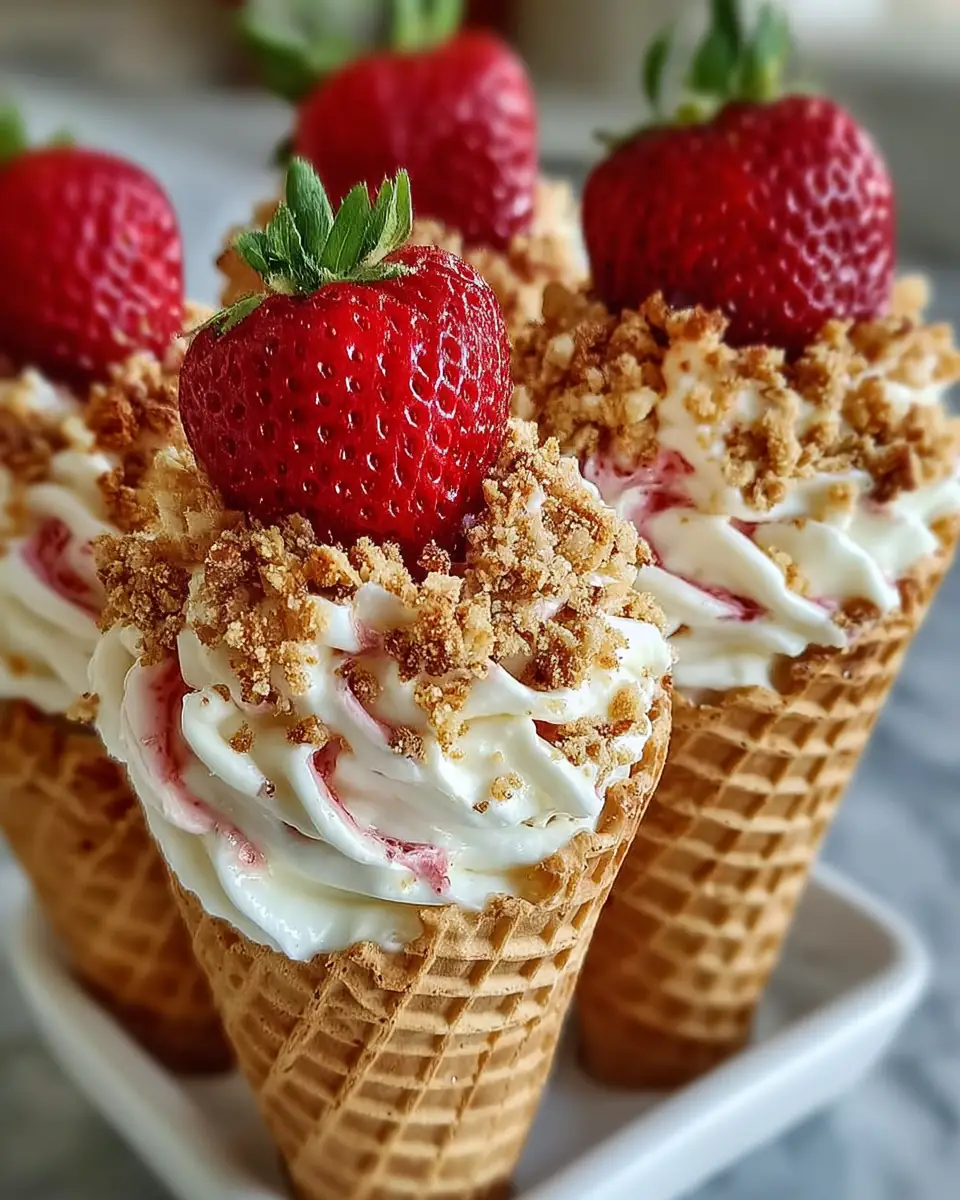
Step 5: Assemble the Cones
Now comes the fun part—assembling the cones. This step involves layering flavors and textures for the perfect dessert.
- Fill the Cone: Take each waffle cone and fill it halfway with the cheesecake filling.
- Add Strawberry Sauce: Add a spoonful of the cooled strawberry sauce, then fill the rest of the cone with more cheesecake filling.
Using a piping bag for the cheesecake filling can make this step cleaner and more precise. It allows for better control over the filling process, ensuring each cone is evenly filled and visually appealing.
Step 6: Add the Crunch
The crunch topping is the final touch that elevates these cones from delicious to extraordinary.
- Coat the Cone: Roll the top of each filled cone in the strawberry crunch topping, pressing gently to adhere.
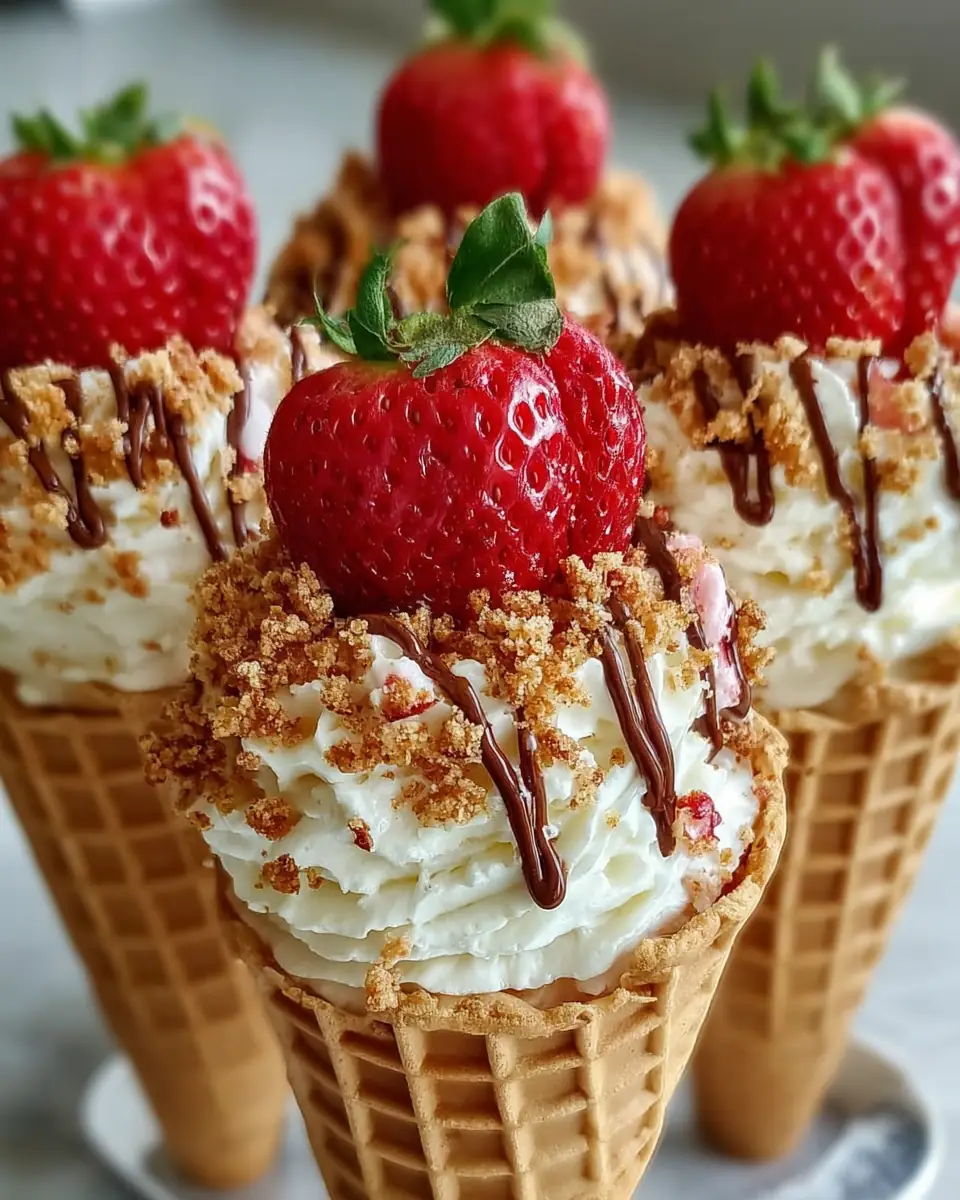
For an extra touch of elegance and flavor, consider dipping the rim of each cone in melted chocolate before rolling it in the crunch topping. This not only enhances the flavor but also adds a decorative element to the presentation.
Step 7: Chill and Serve
To achieve the perfect texture, the cones need time to chill.
- Refrigerate: Place the cones upright in a tall glass or a cone holder and refrigerate for at least 1 hour to allow the cheesecake filling to set.
Chilling not only helps the filling to firm up but also allows the flavors to meld together, making each bite more harmonious and satisfying. If you’re in a rush, a quick 30-minute chill in the freezer can also work, though it might alter the texture slightly.
Exploring Flavor Variations
While the classic version of these cones is undeniably delicious, there are numerous ways you can personalize the recipe to suit your preferences or dietary needs. Here are a few ideas to inspire you:
- Chocolate Lovers: Add a drizzle of melted chocolate inside the cone before filling it with cheesecake or mix cocoa powder into the cheesecake filling for a chocolatey twist.
For an extra indulgent touch, consider incorporating mini chocolate chips into the cheesecake filling. This adds a delightful surprise in every bite and pairs beautifully with the strawberries.
- Nutty Delight: Incorporate chopped nuts such as almonds or pistachios into the crunch topping for added flavor and texture.
Nuts can also be blended into the cheesecake filling for a richer, more textured dessert. Consider using hazelnuts for a unique pairing with the strawberries and vanilla.
- Tropical Flair: Substitute the strawberries with mango or pineapple for a tropical twist, complemented by coconut flakes in the crunch topping.
For a tropical variation, you might also consider adding a splash of coconut milk to the cheesecake filling, enhancing the tropical theme and adding a subtle coconut flavor that pairs beautifully with tropical fruits.
Nutritional Information
For those mindful of their dietary intake, here’s the nutritional breakdown per cone:
- Calories: 350
- Protein: 5g
- Carbohydrates: 30g
- Fat: 22g
- Sugar: 18g
It’s important to remember that these values can vary based on specific brands of ingredients used and any modifications you make to the recipe. For those seeking a lighter option, consider exploring the healthier alternatives below.
Healthier Alternatives for the Recipe
For those seeking a lighter version of this dessert, there are a few substitutions and modifications that can be made:
- Cream Cheese: Opt for reduced-fat cream cheese to cut down on calories and fat.
Using a combination of reduced-fat cream cheese and Greek yogurt can further lighten the filling while maintaining its creamy texture.
- Greek Yogurt: Substitute Greek yogurt for a portion of the heavy cream. This not only reduces fat content but also adds protein.
Greek yogurt also introduces a slight tanginess to the flavor profile, which can complement the sweetness of the strawberries and the richness of the cream cheese.
- Sugar Substitutes: Use sugar substitutes like stevia or erythritol to decrease the amount of sugar.
These substitutes allow you to enjoy a sweet treat without the added calories from sugar, making it a more diabetic-friendly option as well.
Serving Suggestions
These Strawberry Crunch Cheesecake Cones are versatile and can be paired with a variety of accompaniments:
- Beverages: Pair with a refreshing mint lemonade or iced tea for a delightful summer treat.
For a more decadent pairing, consider serving with a chilled glass of rosé or a fruity sangria, enhancing the summery feel of the dessert.
- Ice Cream: Serve alongside a scoop of vanilla ice cream for an extra indulgent dessert experience.
If you’re opting for the tropical variation, consider pairing with coconut or mango sorbet, which will enhance the flavors and add a refreshing element to the dessert.
- Garnish: Add a sprig of fresh mint or a slice of strawberry on top for an elegant presentation.
For a touch of sophistication, dust the cones with confectioners’ sugar just before serving, adding a hint of sweetness and an appealing visual contrast.
Common Mistakes to Avoid
To ensure your cones turn out perfectly, here are some common pitfalls to watch out for:
- Overbeating the Cream Cheese: This can lead to a runny filling. Aim for just smooth enough consistency without overmixing.
A runny filling can also result from not properly softening the cream cheese before mixing, so ensure it’s at room temperature for best results.
- Insufficient Chilling: Not allowing the cones to chill long enough can result in a less firm cheesecake filling.
Chilling also helps the flavors meld together, so don’t rush this step if you want the best taste and texture.
- Warm Strawberry Sauce: Ensure the strawberry sauce is completely cooled before assembling to prevent the cones from becoming soggy.
If you’re short on time, spread the sauce thinly on a baking sheet to cool it more quickly before assembling.
Storing Tips for the Recipe
Proper storage is key to maintaining the freshness and texture of these cones:
- Refrigeration: Store leftover cones in an airtight container in the refrigerator for up to two days.
To prevent the cones from becoming soggy, consider wrapping the filled part in plastic wrap and keeping the cones upright in a container.
- Avoid Freezing: Freezing is not recommended as it can alter the texture of the cheesecake filling.
If you must freeze them, consider freezing the components separately and assembling them fresh when ready to serve.
Conclusion
In the world of desserts, these Strawberry Crunch Cheesecake Cones stand out as a unique and delicious treat. The combination of creamy cheesecake, fresh strawberries, and a crunchy topping creates a symphony of flavors and textures that is simply irresistible. Whether you’re enjoying these cones at a picnic, a family gathering, or a cozy night in, they’re sure to be a hit with everyone. So why not give this recipe a try and delight your friends and family with a dessert that’s as beautiful as it is delicious?
These cones are more than just a dessert; they are a celebration of flavors and creativity, showcasing how traditional elements can be reimagined into something extraordinary. Enjoy the process of making them, and even more so, the joy they bring to those who get to savor them.
FAQs
Q: Can I use frozen strawberries for the sauce?
A: Yes, you can use frozen strawberries. Just make sure to thaw and drain them before use to avoid excess liquid.
Using frozen strawberries can be a convenient option when fresh ones are out of season, ensuring you can enjoy this dessert year-round.
Q: How can I prevent the cones from getting soggy?
A: Ensure the strawberry sauce is completely cooled before assembling to prevent the cones from becoming soggy.
Additionally, consider serving them immediately after assembly for the crispiest cone texture.
Q: Can these cones be made ahead of time?
A: Yes, you can prepare the components in advance and assemble them a few hours before serving for optimal freshness.
For best results, store the cheesecake filling and sauce separately and combine them just before serving, ensuring the freshest taste and texture.
For more delicious recipes and cooking tips, be sure to explore our other posts on the Food Lovers Blog. Happy cooking and enjoy your culinary creations!


Strawberry Crunch Cheesecake Cones
Ingredients
Equipment
Method
- Prepare the Strawberry Sauce: In a small saucepan over medium heat, combine the diced strawberries, granulated sugar, and lemon juice. Stir occasionally until the strawberries break down and the mixture thickens slightly, about 10 minutes. Remove from heat and let it cool completely.
- Make the Cheesecake Filling: In a large mixing bowl, beat the softened cream cheese with an electric mixer until smooth and creamy. Add the powdered sugar and vanilla extract, and continue to beat until well combined.
- Whip the Cream: In a separate bowl, whip the heavy cream until stiff peaks form. Gently fold the whipped cream into the cream cheese mixture, being careful not to deflate the whipped cream.
- Combine the Crunch Topping: In a shallow dish, mix together the crushed vanilla wafer cookies and crushed freeze-dried strawberries. This will be your crunchy topping.
- Assemble the Cones: Take each waffle cone and fill it halfway with the cheesecake filling. Add a spoonful of the cooled strawberry sauce, then fill the rest of the cone with more cheesecake filling.
- Add the Crunch: Roll the top of each filled cone in the strawberry crunch topping, pressing gently to adhere.
- Chill and Serve: Place the cones upright in a tall glass or a cone holder and refrigerate for at least 1 hour to allow the cheesecake filling to set.
- Enjoy: Serve these delightful Strawberry Crunch Cheesecake Cones chilled, and savor the creamy, crunchy, and fruity goodness with each bite.